The Process of Building a Pool
Winter has finally come to an end, and the days of bundling up to stay warm are over. The time for warmer weather is now, allowing you the opportunity to spend more and more time outside. While the weather has gotten warmer, it isn’t exactly the blistering heat we are used to as Texans, but it does give you plenty of time to finally install that dream pool of yours. The process of building a pool can take anywhere from 6 to 10 weeks. It is important to understand the process of building a pool if you have truly made a commitment to one.
The Process
- Project Design: Here at Mid City Custom Pools, we pride ourselves on being pool builders that craft the perfect yet unique pool for every one of our clients. The initial first step of building your pool is meeting with one of our skilled designers to plan out just how your pool will look. Whether you want a classic geometric swimming pool, innovative free form pool, an attached spa, or even plan on adding outdoor living spaces, we will go over all of these additions and designs in our initial meeting. Once a design is settled on, our builders will survey the property it will be built on to ensure that there will be no issues with the building.
- Acquiring Permits: Before any actual building can actually begin, we first have to make sure you receive all the proper permits and approvals, so your pool can actually begin construction. As the builder, we will acquire permits for the construction of the pool, but you as the homeowner must get the HOA, Homeowners Associations, approval. Permits for gas, electricity, and all other utilities will be obtained by those contracted to do said work. Once all permits and approvals have been acquired, it is time to build.
- Excavation: With the plans approved and permits secured, our builders will go over to the construction site to go over the process. Once there, they will meticulously set up little boards to ensure that your pool is being built in the right location. After you have okayed the set-up, we can begin excavation. It is a very messy and dirty process, but it is necessary and unavoidable. Depending on the weather and soil condition, excavation typically lasts just a couple of days.
- Installation of Structural Steel and Plumbing: Steel reinforcement will be placed along with the structure of the shell, providing it with the necessary strength. This steel grid will essentially act as the backbone of your pool. These bars are placed horizontally and vertically for the highest level of reinforcement. Once the steel structure has been placed, plumbing can be officially installed. Each pool’s plumbing is designed to get the best possible circulation and filtration, providing you with clean and healthy water for you to swim in. The plumbing is very particular to the shape and style of your pool.
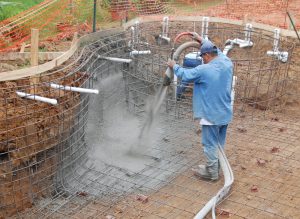
- Application of Gunite: Once your steel reinforcement has officially been installed, it is time to move on to the next step in the process. High-pressure gunite is applied to the steel grid in your pool through a hose by one of our skilled builders. Gunite will tightly bond around the steel, providing your pool with the best possible strength. You should lightly water the shell of your pool once the gunite has been applied at least three times a day over the next 5-7 days. Do not worry about water collecting at the deep ends of the pool since that will be pumped out before the next step.
- Installation of Tile and Coping: If you haven’t at this point yet, you should finally decide on the type of tile you would prefer to line the walls and floor of your pool. Our builders will carefully and skillfully lay out the tiles of your pool to make sure your pool is durable and non-porous. Coping will also be applied around the edge of your pool to best compliment and protect your pool. During this time any added water features will also be applied.
- Completion of Utilities: Any other utilities will be completed once the tiling is set. This will include finishing plumbing, electrical, and gas. These are all necessary once all of your appropriate equipment for filtration, water pumps, and other optional attachments for the pool is done. Your electrical set up will need to pass a city inspection before the construction of your pool can proceed. A gas line will also be installed if you choose to add a fire feature or outdoor kitchen.
- Decking: The deck around your pool should reflect the overall aesthetic you choose for the tiling and style of your pool. The deck isn’t typically too large with many sitting at four inches thick also being reinforced with steel. Whatever style of decking will be completed once you’ve chosen one. Also, any of our outdoor features such as an outdoor kitchen, cabanas, and pergolas, or outdoor living areas will be installed during this step.
- Application of Finishing: We are almost complete with your pool! The pool interior will finally be coated with a finish of your choice that best fits the design and style of your pool. Different finishes can give your pool a very distinct and unique look. It usually takes roughly 24 hours for the finish to properly cure, but once it is cured it is time to fill your pool up!
- Filling it up and Swimming: After any access materials and dirt have been cleaned away, it is finally time to fill your pool up. One of our technicians will be on hand to make sure that any installation and equipment is up and running properly. They are also there to make sure your pool’s water chemistry is balanced. Once full, you will then be taught a few lessons about proper pool maintenance.
Building a pool can be a long and arduous process, but once the complete, you will soon realize how worth it the process can be. Mid City Custom Pools is your premier North Texas pool builders. We are here to ensure that you get the expertly crafted pool of your dreams. Contact us today to learn more about the process or start yours started today!